Let the Fresh Air in
Solexx panels deliver maximum soft, diffused light to plants enclosed in greenhouse structures. Lest we forget that plants also need fresh air. Proper ventilation prevents diseases, reduces overheating and releases excess humidity. For best results, air should circulate evenly through small greenhouse spaces during the growing season. Cross ventilation can be achieved by placing base vents close to the greenhouse floor coupled with a large vent or exhaust fan positioned on the back wall. This technique forces fresh air into the greenhouse and releases stale air up and out the back. Vents can be closed in winter to save on heating costs.
Growing Year Round
What I can grow in the greenhouse is only limited by how warm I can keep the structure year round. My ultimate goal is to overwinter tropical plants, so I will need to keep the ambient air temperature above freezing, optimally 32 – 40 degrees. Growing warm weather plants and starting seeds, a minimum temperature of 60 – 70 degrees is recommended.
To complete this project for a 6’x8′ greenhouse space, you will need two people, approximately two hours and the following items:
| Materials Required | Tools Required |
| 4 base vents | Box knife |
| 16 1″ white screws | Black sharpie marker |
| 1 piece scrap Solexx panel material | Socket wrench |
| 1 piece scrap cardboard | Power drill and 5/32″ drill bit |
| 8 right angle brackets* or 8 12″ PVC pipes | Painter or masking tape |
Template Creation
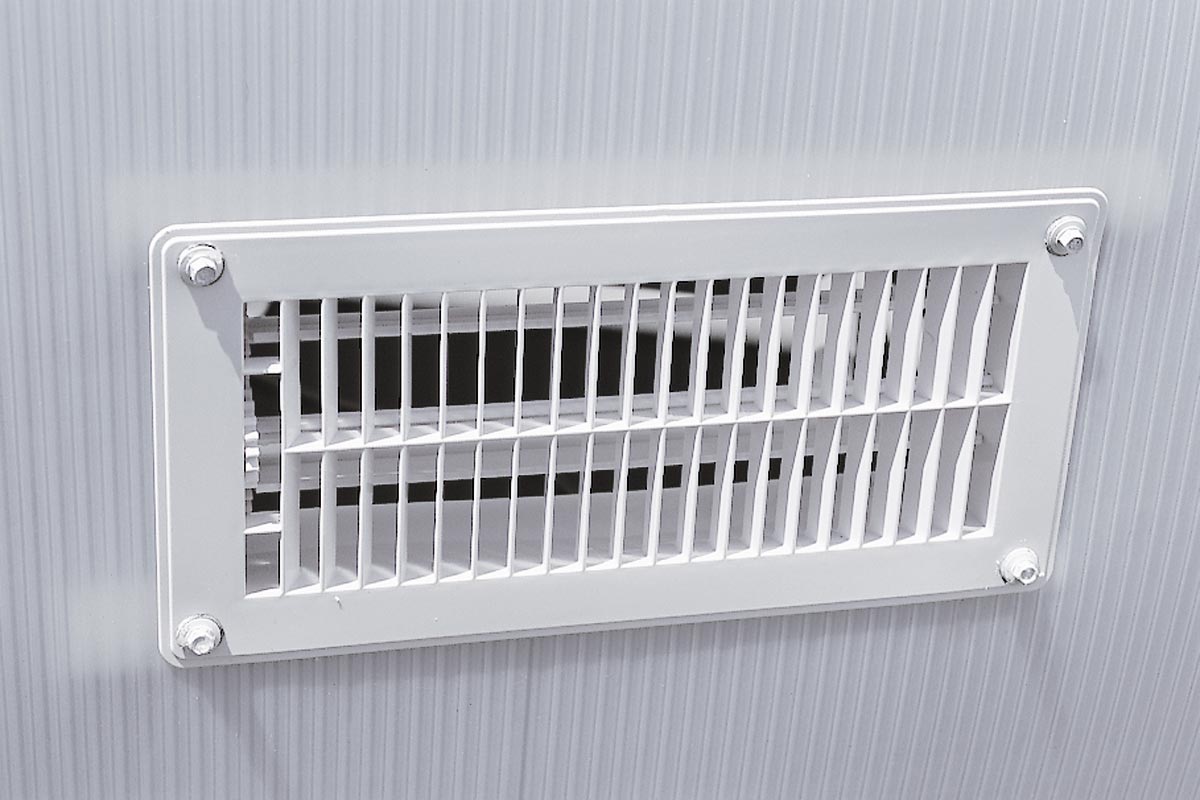
Once the Solexx panels were attached to the aluminum frame, we installed closable base vents. The Solexx panels arrived rolled in cardboard which we recycled as a cutting surface. The leftover panel material came in handy to create vent templates. The templates made sure the vents were the same distance from the base of the greenhouse floor. We measured six inches (6″) from the base of the greenhouse positioning the cardboard to create the template. Next, we copied the base vent template onto the Solexx panel marking which way to position the vent.
Married to an Engineer
The round PVC piping provided by Solexx in the base vent kit provides buckling protection of the panels. Being married to an engineer can be a curse when it comes to these types of projects. He always prefers to come up with a “better way”. He ultimately changed how the base vents were installed on our greenhouse frame. After much discussion and cajoling, my husband opted to use metal angle brackets* instead of the PVC piping provided. To keep hole drilling mistakes down to a minimum on the greenhouse, he pre-drilled holes in the four corners of the base vent and angle brackets using the Solexx template and power drill with a 5/32″ drill bit.
Installing Base Vents on Greenhouse Panels
The base template was again used to position the vents six inches from the greenhouse base. Tape or hold the template on the panel. Copy the 4 1/8″ x 10″ horizontal opening using a black sharpie marker. The Solexx panels are easy to cut using a standard box knife. It is helpful to have two people for installing the vents and positioning the brackets. One person holds the brackets and vent on the inside of the greenhouse while the other person uses a socket wrench to screw the base vent and bracket into the Solexx panel. Make sure the panel does not buckle. If it does, back out the screw until all pieces lay flat against one another.


Next Steps
Even though the base vents are installed and help to keep the air temperature stable, cross ventilation will not take place until a large vent is positioned on the back wall of the greenhouse. I am considering purchasing a 24″ x 12″ Easy Flow Louver with a solar louver opener or a 12″ exhaust fan (760 CFM)with a 12″ intake shutter.
Have you had any experience with either of these units in your own greenhouse? I would love to hear your experience and comments!
3 responses to “Installing Base Vents on a Solexx Greenhouse – Helpful Tips”
•
[…] Base vents were installed when the weather was much cooler. Although they have assisted in keeping the temperature stable – without cross ventilation lifting and releasing hot air building up inside – the thermometer registered over 100 degrees. We installed the Easy Flow Louver to the upper back greenhouse wall to expel hot air and add fresh air inside. […]
•
We are just about ready to install our vents into the Soleex greenhouse that we are assembling. This information was very timely. The idea of first making a template will likely save us time and frustration.
Thanks,
Tom B.
Alabama
•
A template is a great idea to make sure you don’t cut the material wrong. Give us a call if you have any questions!